Take a look at this van. Does it look ready for the scrapyard? It’s got lots of body damage, you say? Forget about body damage for a minute; I must have been suffering from brain damage when I bought this battered hulk.
I had already done a number of smaller fixes to get the van rolling, but before I could get to the bodywork, there were still several important issues that needed my attention.
For starters, none of the exterior lights on the van worked except for the headlights and the left rear taillight. All the turn signals were out. New bulbs from the local Napa got the taillights and reverse lights working again, but not the blinkers. So I took the blinkers off and found that at some point, they had filled with water and shorted out. So I ordered some new sockets, wired them in, and voila, the turn signals and bulbs were working again! I was kind of floored to learn that the turn signals were self-cancelling. Wow – high-tech!

I pulled out the shifter and rebuilt it with an OEM kit I bought from a German parts vendor. But the shifter still shrieked each time I changed gears. One day, during a hike at a local state park, I had an epiphany, and grabbed a three foot long twig. I took it home, pruned off any offshoots, and fastened myself a long dowel. I then greased the tip and fished it through the tiny opening around the shift rod, applying grease to the area around where the shift rod bushing used to sit, and this got rid of the shrieking when shifting gears. Oh yeah!
Summer arrived, and I finally felt like I had the time and energy to get down to bodywork and rust repair. But my goodness, where to begin? I decided to start with a rust hole about the size of your two thumbs on the passenger side. After I sanded off the bubbly paint, I realized it was nastier than I thought, and bigger, too.


After I had a satisfactory repair of that hole, I wanted to move on to the ugly rust hole below the windshield. This was going to require removal of the windshield and then a brand new rubber seal. Using a combination of three long flathead screwdrivers, I was able to push, pull, and pry to get the leverage I needed to pop the windshield out. It came out in one piece, and I thought, that wasn’t so hard! (I would later break the windshield when I took it out a second time to replace the old seal – D’’oh!)
I worked hard to grind off all the rust. Rust is cancerous, and the only permanent solution is to cut it out. But I wasn’t going to go to that extreme. I took the affected area down to bare metal, POR-15’d it, bondoed and then primered. In the end, I was happy with the results. No more ugly rust hole!
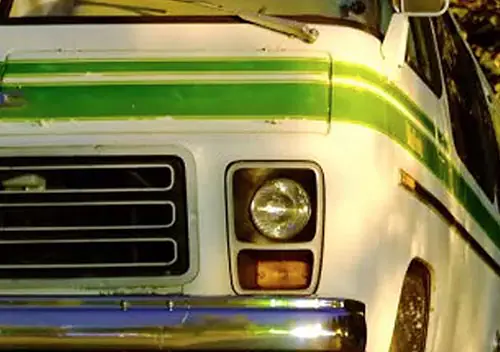
Finally, I was ready for the big-league job of attempting to pull the dents from the crunched in front end. I have no idea what happened in the original collision, but it looks like Jeddy may have hit a pole or a parking meter or something. There was damage to the front above the grill, and the deeply cracked paint suggested that the accident happened long ago. Jeddy might have been in this sad state for decades. The grill had been replaced at some point. And below it lay the most challenging part. The damage there was a long, deep folded crease. Both dents could not be pulled with plunger dent pullers or PDR techniques; They were old and heavy-duty wounds, which is why no one had bothered to fix them.
Here’s what the seller said about this van: “the frame is perfect, no rust, no issues, but the body needs some dents taken out as well as some rust repaired (all of which you can see in the pictures)”.

Let me tell you something: With damage like that, you don’t just “take out” the dents. You need to be a skilled tradesman in the art not just of pulling dents, but of using Bondo and having or acquiring endless patience to block and sand. And while I had done some minor bodywork on my VW Eurovan years earlier, this was unchartered territory. But I figured this was probably the reason I was able to buy a Westy on the cheap.
Filling the crescent shaped dent with Bondo took no time at all. But flattening it flush with the body took forever. My block sanding skills are not great, and when it comes to body repair, you will see the slightest ripple if the repair is not perfectly flush. I was not able to get it perfect, but I’m satisfied with the repair.
You can fill dents with Bondo to about ¼”. Any deeper than that and you need to pull the dent out. At first, I tried this with a stud welder. The progress was maddeningly frustrating because the bottom dent was so long and deep. And there were areas where the metal was so thin that yanking the dent out with the sliding weight just ripped a hole right through the sheet metal. So I had to resort to the cruder method of drilling in holes and then using a slide hammer to gradually work the surface back to flush. I spent hours and hours drilling and yanking, making an awful racket in the front yard; I’m sure the neighbors were none too pleased. I don’t have a functioning garage, so all my automotive work is done outside in the driveway. Sometimes I get self-conscious about that, but at the end of the day, I’m just grateful to have a space with which to work on my cars.
Gradually, I reached a point where I had swiss-cheesed the front end good and worked it back to straight. Then, it was more grinding, and filling and sanding on both sides of the holes. This was done on and off for about two months. At times, I’d get overwhelmed and throw my hands in the air. Then after a few days, I’d muster up the resolve to keep going. It was a very taxing job for one man, and I wouldn’t have done it for any vehicle I wasn’t irrationally and absurdly in love with.
And one summer evening, as twilight was setting in and the last coat of primer had been wet sanded down to a glossy finish, I watched the last rays of light cast their gentle caress over Jeddy’s front end. I tipped my beer and saluted a job well done. Jeddy was whole again. And so was I.

After I went through this same process with the slider door, there was one quirk that was really vexing me: Jeddy’s idling issue. If you’ve followed this series from the beginning, you may recall that the van would just cut out and die at startup unless you fed it gas at startup for a couple of minutes until it reached operating temperature. You may also recall that I punted on purchasing the van initially when the seller disclosed this nuisance.
I spent hours poring over the manuals I had and listening to the sages on The Samba, a VW forum filled with people a lot more knowledgeable about cars than yours truly. Was it a cracked intake boot? I ordered one and replaced it. Nope. Was it the air auxiliary regulator? I removed it and tested it with a multimeter; It seemed OK. Was it the finicky Temp II sensor? The Cold Start Valve? The fuel injectors? The idle mixture? One by one, I chased these suspects and, in turn, chased my own tail.
One day, when I was hanging around at an independent VW repair shop to pick up a replacement windshield for the one I cracked, I picked the tech’s brain. He pointed me in the direction of a website run by and old aircooled wizard, who wrote about a similar malady to mine that had plagued Type II bay buses. He claimed it had to do with aging L-jet systems and the engine getting too hot at the warmup cycle. I found an engine temperature spacer on ebay made for a Porsche, and ordered it. I screwed it in to the engine head temperature sensor, installed it, and started the bus up. I waited with baited breath…and the idling held strong! No more stalling out! Hooray!
I don’t want to leave you with the illusion that this bus is ever going to be perfectly restored. Jeddy’s still rough around the edges, and he will always have some quirks. But I am very grateful for all I’ve learned about the van (and myself) by taking on a project of this magnitude. When I first started frequenting Curbside Classic, I never thought I would end up buying my own classic and restoring it myself.
What a long, strange trip it’s been!




And there will be more long, strange (but likely interesting) trips with Jeddy as you work through and learn to live with his various quirks. I don’t know if I would have the patience to keep a quirky old VW camper alive, but I salute those who take it on themselves. Well done.
I liked seeing the work you did on the Westy. I once had a 1970 Type II panel van that I used for work as a painter. The van was easy to work on and I always found a solution for mechanical repairs and never had to take it to a shop. As for bodywork I would have done it the same way. Good enough for a daily driver and will last for years. 🙂
I admire anyone that commits to bringing an old car back to life and sticks with it. And good job in trying and doing the resto work yourself.
Keep on keepin’ on.
“… I screwed it in to the engine head temperature sensor, installed it, and started the bus up. I waited with baited breath…”.
While it has been some time that I did such attempts of self repair on aging vehicles, when such a fix takes hold and works as intended, the feeling of independence and self sufficiency is quite rewarding.
But your body work successes are WAY beyond what most non-professionals could achieve.
Jeddy looks great!
Wow, what a great and inspiring story! You now have a bus that looks fine, works well, and you know that it’s because of your own work and not just your checkbook. It must make it even more satisfying when you pop the top on the beach and hang out next to it with a beer. Good job!
I will second RLPlaut on your body work skills. You have a definite set of them and you also have a good combination of patience and perseverance. It has worked out quite well for you.
This has been a great series – keep them coming!
Fantastic story! The biggest bonus to all this is the fact that you are having these successes with a camper van! The props to your camp fire stories are always with you as you sit around your camp fires with friends and beers. That’s fine entertainment right there!
Impressive work! Great to see a battered old Westy come back to life again.
I, too, did my first body work/dent repair in the driveway. When dealing w/ smoothing dents, and sanding bondo, patience IS a virtue. Congratulations on some fine work! As long as YOU are satisfied with it is what really matters! 🙂
Nice work! Windshield rust seems to be the bane of coastal cars. I remember looking at a Vega in Pacifica before I bought my Vega on 1976, and at just two or three years old it had severe rot around the base of the glass. And by the time my own Vega, which came from the dryer climate of Orinda, was about 6 years old and had lived mostly in Berkeley and Fremont, it too started showing signs of rust around both the windshield and rear glass. Even my 1997 Toyota T100, here in Santa Cruz, had bad enough rust that when I had the glued-in windshield replaced in 2015, the tech said that it might crumble away the next time it need glass and require a welded repair. He wire-brushed it and used POR.
It’s because ocean air (loaded with salt) condenses on the windshield glass inside and outside the car and then drips down over the seal onto the metal and then evaporates, leaving the salt behind.
That’s my best Wild Assed Guess anyway
Wow, that’s some impressive body work I think, it’s a decent “20 footer” now for sure. I have always loved the Buses and Vanagons, you made a great purchase.
Indeed, the body work is not of the pricey professional level but, rather, of the amateur ‘just right’ type.
Likewise, this is a terrific example of what can make the trials and tribulations of owning an idiosyncratic old vehicle ultimately rewarding: figuring out what’s wrong and then that satisfying feeling of accomplishment when it’s been fixed. With the advent of the internet, it’s not nearly as hard as it once was. I particularly liked greasing up the shift rod with an appropriately sized handmade twig.
A bonus is not having to worry about a door ding marring a $50,000 Bus
Couldn’t get to back of the panel?
No easy access to the back of the panel, unfortunately. Had to go the tougher route.
The older Buses had the spare in front of this panel, but I suppose the radiator meant this wasn’t an option?
The spare on these is under the front floor, ie: between the front seats and the back of the bumper panel. These old things are deceptively big.
No radiator on this one as it’s aircooled, but the spare’s still in the same position on the watercooled ones, the pipes somehow fitting over the top of it.
On the watercooled jobs, there’s a second grille right where the repair was done here.
Hmmm, cutting a hole and installing a grille from a water cooled unit might have been tempting.
Thanks for all your kind comments so far, guys! I really have enjoyed the satisfaction of bringing this old Bus back to life.
I intend to paint over the primered front end this summer. Jeddy’s “Assuan Brown” paint looks really good now that he’s been buffed back to a clean slate. The OEM equivalent touch-up paint that’s out there is a really, really close match. It’s expensive as hell, but it will be worth it once he’s painted.
But TBH, I have kind of enjoyed the rough-and-tumble look of the primered spots. It says to me “this is an owner who loves his car” and “work-in-progress”. When I see other classic vehicles in that state, I always have an admiration for whomever is working hard to fix their car up.
Some friends and I camped next to a couple of guys who had one of these, a very well-kept one in highly original condition. What they liked most about it, and we all agreed, was its wonderful amount of clear, useable space within a remarkably compact vehicle. I occupy my 2002 Subaru Forester on these excursions, stuffing a self-inflating mattress into just enough clear space in both directions for my bag and bod … and the much roomier Westy occupies almost exactly the same amount of ground! I like the looks a lot, too.
I would like to add my congratulations to the above. All suitable repairs and got lucky once or twice. A wonderful project, I am highly jealous and wish I was set up at the right point in life to do this. I am stuck with a 40 year newer, clean stick shift Audi I drive 100 miles a month….a distant relative to your camper.
Rust is just nature’s way of lessening the load on the drive train.
Good to hear that you used POR 15. If you apply it directly onto the rusted metal it seals out moisture and will prevents/delay more rusting. You can use the putty as a filler to bridge gaps in the sheetmetal. You can roll out the putty like a small tortilla and use it as a a patch. Then put another coat of POR paint over the repair. That stuff drys as hard as steel. Then you can cover that with some bondo. A lot of people just use bondo but that’s a bad idea, bondo will soak up moisture and start to rust under the paint. I repaired part of a rusted inner fender lip on a Datsun 240Z with the putty, and it couldn’t be told from the surrounding steel.
Now, I know that this isn’t Concours level restoration, but it’s perfectly acceptable for an old driver. Eastwood has a “no welding” patch panel attachment system. It comes with the necessary tools to attach a patch panel with bonding agent and flush rivets. It works really well and I also used it on that old Datsun.
I can hear the self appointed purists screaming from here, but realistically a lot of cars just aren’t worth investing that kind of money into. A lot of us can’t afford to do it any other way, and we wouldn’t spend the money even if we have it. Keep up the good work.
I too admire your skilled persistence – in my short, frustrating ownership, I never did get my watercooled bus to run right – but I’ll freely confess to being glad I’m not your neighbour! I’m not sure if this is technically true, but I’d swear these T3’s are made out of thicker-than-usual gauge metal.
They do have an irrational pull, these old boxes. Mine was just awful, yet I still want one when I read stories like yours.
You didn’t have brain damage, but had and still have a mild affliction. Worry not, it’s lifelong, but generally harmless.
I will add to the series of salutes on your body skills. You have done a nice job on these repairs, jobs that many would either botch or ignore. Kudos!
I will also agree that there are few things more satisfying than sitting back and gazing at some irritating thing on the car that has been nicely repaired. Some cars give us more opportunities to do this than others.
Me thinks you should have a pic of toasting a beer after each instalment. Cuz. You deserve it. Looking forward to more updates. Prost
Love this… I’ve also got an 81 Westy, Assuan Brown. The woefully underpowered aircooled motor was blown when I got her. I live in Ohio and a few years back I owned an aircooled 82 vanagon which I drove year round and froze to death for at least 3 months out of the year which was what made me decide I had to have heat in this one so I got the hairbrained idea to add a coolant system and install an inline-4 MkII Golf engine for more power. Fast-forward about 4 years (lots of time and budget restraints = forever) and I’m just about finished. Hope to fire her up by this weekend. Anyway, it just does my heart good to see someone bringing an old girl back to life, especially when it’s an Assuan Brown ’81. Bravo!